Sunday 31 May 2015

Tutorial on Altered Desk Calendar

Hi Friends, 

Hope you all are enjoying this feminine themed month at Lulupu! Have you linked your entries yet, you still have one day's time left.


Today, I have a very easy project to share with you all. We all have used desk calendars at some point or another. What happens to those calendars, once the year is over? We trash them. Instead, we can use the base of the calendar to experiment with our creative side and make something unique and beautiful. 


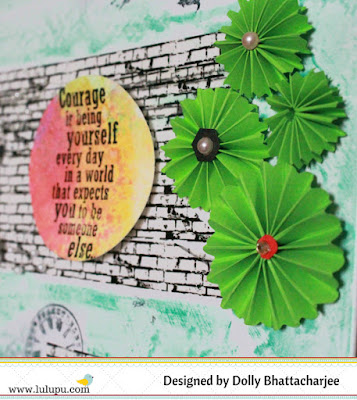
For my project, I chose an old desk calendar and removed the month pages. On the hardboard surface, I made a background with some washi tape. Yes! that awesome looking wall background is made using a washi tape. Isnt the use of this tape endless!To give it a finish, I layered some mod podge on the entire surface. Next, to add some color, I chose some green gelato, which I blended using my fingers after misting it with some water. 


To add some more layers to the project, I stamped some written script from Tim Holtz stamp set, added a doily from my stash and cut out some stamped butterflies from the same stamp set. To add some interest, I colored the butterflies with some gold gelato which was blended with water. I also used some hand made rosettes in green color to go with the theme and for a pop of color. 


Last, but not the least, the main sentiment is also from the same Tim Holtz stamp set, which was stamped on a waste water color paper from my stash. I love the way the color strikes a contrast with the background and the green colors. I added a string of pearls and used some foam tape to adhere the sentiment to the panel.


I hope you liked this quick tutorial on how to turn your desk calendars to a piece of beauty. Do leave some love if you felt inspired by this project. 

See you all again with a new project for the next month!

Adios!

Dolly

Supplies from Lulupu:

Friday 29 May 2015

Door Hangers

Hello Everyone,

Manu here and I hope that you all had an awesome time with our theme for this month, this one had to be your favorite one.. it's an theme which we all ladies love and carve for.. this time it was all about Feminine with wings and a lovely color palette. Check all about it here.


I hope you have linked up your entries in the main post above and we would love to see your interpretation of this challenge. 

Here's what I have for my second post this month. I had a commissioned work to make out a few door hangers and I thought it would be apt to share them for my second post as they came out to be so in sync with the feminine theme. The wings portion is probably missing in this creation, but then our second post is all about things we do and love.. So, here are my cute and funky door hangers..


I so love that shade of blue and I really think that everything pops up on that bright and cheery shade. I also shaded the base in pink color to give a little more brighter look to the hangers when looked form the sides. This Julie nutting doll happens to be my favorite and this one is special since it was a Birthday gift from my crafty friend Catherine. I so love this one.
With an added sentiment from Kaisercraft, which also is one of my favorite one, these hangers have  beautiful self motivational message, and these days I'm kind of obsessed with big and bold sentiments.

Here are a few more look of how the hangers turned out to be.


I so so so loved them, very bright and cheerful and full of bold sentiments.


I hope you all liked my work and do leave me some love!
Also do remember to participate in our challenge here.

Happy Crafting
Manu


Supplies used from the store.


Wednesday 27 May 2015

Note Book Cover

Hello Friends!
Tanvi here with another project for Lulupu Challenge#49. You will find all the details for this challenge in Manu's post Lulupu Challenge #49 : Feminine - Use wings & Colour Palette.

For today's post I have a altered mixed media note book cover.

Lots & lots of layers here with stamping, misting & stenciling. The images were stamped on the gessoed surface, in two colors of Archival inks - jet black & vermillion. This was followed by misting with Glimmer mists. To mute down the colors I then added another layer of watery gesso. Finally some stenciling & stamping & my cover was ready! To finish it I stamped "Special Memories" - from the Kaisercraft - All that Glitters set, mounted this on black jute sheet. The butterfly is also from the same set.


Hope you enjoyed todays' project!
Thanks for dropping by & remember you still have a few days to enter our current challenge!
Happy Crafting!

Supplies available at LULUPU.COM
Stamp - Victoria Texture 

Monday 25 May 2015

Party Decoration using the Silhouette Cameo

Hello friends,

Ive been busy this week preparing birthday party invitations and decorations based on the theme Pirates for a preschooler. A special request from the birthday boy was to include anchors, ship steering wheels and maps wherever possible. The main pieces of this project have only been possible thanks to the Silhouette Cameo machine. I know one can patiently cut shapes with a Clicut Retractable knife, but when the task at hand calls for precision and quick turnaround, the Cameo is definitely the better option. 


A quick run down on how I made the banners. The base of each pennant is a piece of white cardstock, edged with washi tape. On it is a piece of torn parchment paper which has been stamped randomly with several shades of Ranger Distress Inks and a map stamp.  The alphabets have been popped up with foam tape and the rest of the shapes stuck with clear glue dots. The font, Pieces of Eight was used in the title of the Disney movie 'Pirates of the Caribbean' and can be downloaded here. All the alphabets and shapes have been cut out from either Core-dinations card stock or American crafts cardstock. The centre piece as well, has all the layers popped on foam tape to give it some depth and looks identical on both sides so that it can be hung from a tree branch.


 Thank you for visiting us today. 
There are still a few more days left to get your wing inspired creations linked up. Click here to read more about this month's challenge - Wings + colour palette.

Cheers,


Friday 22 May 2015

Mixed media tutorial

Hello friends!!!
Neha here, with another inspirational post for this month and today I am sharing a tutorial on  mixed media with you all. Lulupu store has recently added lots of new yummy products be it pattern papers, stencils, mixed media stamps, die- cuts etc. Grab them before they get out of stock.


For today's post I have made a mixed media canvas based on this month's challenge theme (color palette and use of wings). The dress form die cut from Tim Holtz was lying with me from a long time and finally I decided to use it seeing this month's theme. Distressed its edges using DI worn lipstick and dressed it using laces. Wings are made with butterfly die cuts where two of them have been partially layered on each other. Colored them with DIs and added stickles glitter over them, The background was done using some homemade sprays and DIs (Peacock feathers and worn lipstick). I have used the new Prima stencils (Harlequin, Floral petites) and stamps, Heidi swapp mixed media stamps (Music notes, Script). Flowers are all handmade as I love making my own flowers, using different dies from Tim Holtz and Cherry lynn. Used stickles glitter over the flowers and wood veneers also.
Few close ups

Look at the texture and sparkle


Here is the step by step pictorial
1. Started with a chipboard and gessoed it twice.


2. Thereafter stated adding colors by using some homemade sprays in teal and pink color.Also splattered some color drops. Added some more color usig DIs (Peacock feathers and worn lipstick).


3. Did some stamping using Heidi Swapp mixed media stamps and archival jet black ink. These stamps are perfect for creating a mixed media background.  I have also used finnabair's vintage vanity stamp at some places.


4. Added next layer with Ranger's texture paste and the new Prima Stencils. I just love these stencils. At some places I have used Holographic EP over the texture paste while it was still wet. The EP sticks to the wet texture paste and then set it with the heat tool. It gives a sparkling effect to the texture paste.


5. Next distressed the edges with the same DIs. Added some more color here and there till I was satisfied. Also used gelatos through stencil in few areas. And the background was ready! Added layers of thai paper in teal color and doily.


6. Now comes the embellishing part. Placed the dress form die cut over it and thereafter embellished with handmade flowers, pollens, charms, wood veneers etc.That's it.

I loved the way it turned out. What do you think? Do let me know. And Don't forget to play along our current challenge here!!!
Hugs!!
Neha

List of supplies:

Tuesday 19 May 2015

Guest Designer : Lekha Jain

Hello Everyone!

I Loved the theme for this months challenge and I hope that you are having a blast creating feminine creations along with the exciting moodboard (Do not forget to use wings)!! All the details about this months Watercolor challenge can be found here


We have Lekha as our guest designer for this month and she is one amazing person who loves quilling. Well, that's what she loves in the first place - quilling. Lets check out a little more about her and then head over to see the inspiration she has made for us.


 1.Tell us a little about yourself and your family.

Happy go lucky by nature,hospital admin by qualification, quiller and crafter by passion ...this sums up about me. Blessed with wonderful parents and hubby who are my best critics...and its their unbiased,blunt criticism that has helped me grow as an artist.


2. How did you become interested in crafts and what inspired you to start blogging?

Getting into crafting was just a hobby,i would say side effect of being jobless. Quilling still is my first love and my forte. But eventually a mere hobby turned into passion and now my identity..
I learnt everything through various blogs,you tube channels..so for me blogging is sharing my little knowledge with people just like me.


3. What are some of your "go-to" supplies for crafting?
Ok!!the list here could be like never ending saga...but i would still run for a good pair of scissors, super strong adhesives, paper trimmer, scoreboard and my box of quilling tools and strips, infact I often carry my quilling box while travelling!!!


4. What is your favorite crafting technique?
Quilling indeed is my first love but once you start experimenting with other things like stamps,inks,sprays etc..you cant just get rid of the urge to get more and more of these..
Other than quilling I love trying my hand on mix media...or you can say I  love the look of inked hands!


5. How would you describe your crafting style?
Free-style..thats what my crafting style is...I keep experimenting with the look of my projects untill it reaches my satisfaction level.


6. How long have you been crafting?
Its been close to four years of developing a hobby into passion..


7. My signature style
I love my projects to be bright and  flowers,pearls are my first choice. Or rather my weakness!!


8. Who are some of your influences? Who has been your inspiration?
Many many artists have been inspiring me to try new techniques...to name a few...Jennifer Mcguire Ink, Yulia Brodskaya,Rajini Chawla,Hussena Calcuttawala,Neha Bhatt ,Tejal Mehta Shah....thats not the end.


9. When not crafting , what keeps you busy?
Ummmm...to think, aaha!! I am on Pintrest...admiring,drooling on,learning from some amazing work. So its craft on the roll in some or the other form :p


10. What are you currently working on?
Presently I am working on Quilled typography project...to put it in simple language,its a nameplate. Its fun doing customised projects..Another thing i am working on for the first time is an Explosion box.


Thank you Lekha, It was nice knowing more about you and yes, we are definitely looking forward to that nameplate and your first explosion box! Lets checkout what Lekha has made for us.


I have taken a MDF three drawer set...perfect to be part of little girl's or even a teenager's dressing ..
Wanted my drawer set to be girly so what best could be than painting the world PINK!!..(biased towards the color pink!)

1.I have used Camel's Artists' Acrylic Color (scarlet lake and titanium white) to get this pink tone..Though we often use a primer/gesso on the MDF surfaces so that the colors remain true to their tones and also to avoid that stickiness(many acrylic colors/fabric colors give that sticky feeling on drying, especially when used on wooden surfaces)
But I was too lazy to apply a coat of gesso so directly out on the acrylics..and yet there is no stickiness on the surface..  

2. Next step was choosing a pattern paper and the prettiest in my stash was this particular Webster's Pages paper pack ( Postcards from Paris II), i just love prints this collection has. Actually tough using them ;P . These just look pretty sitting their on the shelf..(isn't  that a sign of a Hoarding Syndrome!!).
Cut the paper to respective sizes of the top, sides and drawer units..Used Mod Podge to adhere them to the painted unit.


3. On the sides have given a little texture using Sakura modeling paste and Rangers gothic stencil( i have a crush on this the damask design). Mixed a little Gold acrylic color from Sakura.


4. On the uppermost drawer I used corner die from Die-Namics Four corner die set..Layered two pcs and then heat embossed with Rangers Gold embossing powder.


    The second drawer has a little girl cutout embossed with rangers Verdigris embossing powder, just love the mix of colors it has.


5. The top of the drawer unit has resin embellishment which has been gessoed, sprayed with Lindy's and than heat embossed with gold embossing powder. Mulberry flowers and fillers complete the look.


I Hope you liked tiny miny drawer set. 

Love Lekha.


Wow, Lekha, this all pink drawer is a heart stealer for sure! I loved the arrangement of the flowers on the top! 
So guys, this is perhaps the most interesting challenge this time, grab your thinking caps and make something feminine ! You can enter in the challenge here.

Happy Crafting
Manu

Friday 15 May 2015

Scrapbook

Hello friends!!!
Neha, here and today I am sharing with you my project for the current Challenge# 49. This month's theme is all about creating a feminine themed project along with a twist- to use wings and a cool color palette.You can find all the details about the challenge here

                                Lulupu Challenge #49 : Feminine - Use wings & Colour Palette.   


For this challenge I have made a scrapbook which is inspired by the given color palette and for the wings part I have used a Prima doll stamp- Olive, along with the wings (Stamp from Prima) and butterfly.
The gorgeous pattern paper are from eno- greetings. I have used a lot of die cuts on the cover page which were there with the same paper pad. Also used flower lace (from my stash), fabric lace, washi tape, liquid pearls, flat back pearls and flowers.
Some close ups


  The doll image was colored with pencil colors and faber castell sketch pen. Made her dress with pp, lace and adorned with pearls and rhinestones. Wings were stamped on a pattern paper and then fussy cut. I have used stickles glitter over the wings, top and hairband. Glued the image over the cover using foam dots. 
These are some of the inside pages. The edges have been distressed with spun sugar DI


I have used MS doily punch at lot of places. This one is my favorite MS punch!!


 The die cuts are from K & company. These are gorgeous and they have glittered ones also.


I hope you like it!!! Do take part in the challenge here!!!
Hugs
Neha

Supplies from store:

K&Company Die Cut Cardstock Cardstock Madeline
K&Company Die Cut Cardstock Itsy Bitsy Baby Girl 

Inkssentials Wonder Tape Redline 1/2"

Mini Glossy Accents


Wednesday 13 May 2015

Challenge #49: Mixed Media Layout Tutorial

Hello dear friends,

Kripa here with my take on this month's challenge
Feminine use wings + color plalette

One of the reason I make scrapbook layouts, is to preserve memories, so this time I decided to make some memories while creating this mixed media layout with my kids. Read along for a tutorial.


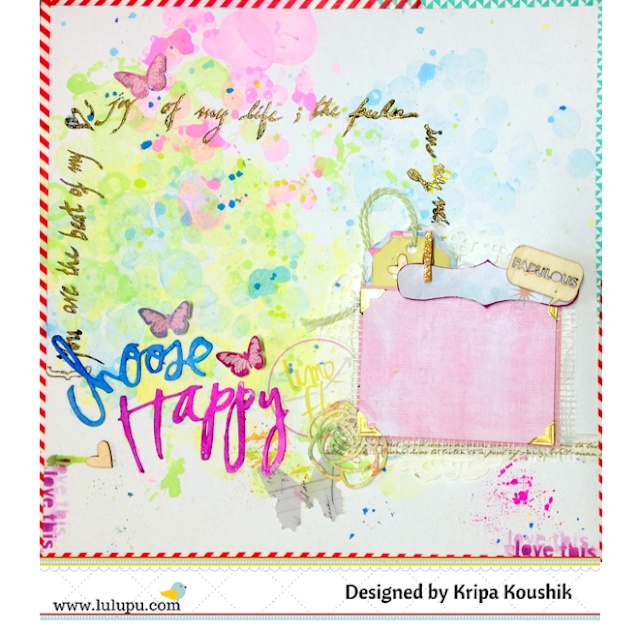
Inspired by the soft colors in the mood board, I decided to go for a watercolor, dreamy  and fun background. In a disposable container mix some bubble water and mist/ paint. Yes, you read that right, Bubble water😊 I made four cups of colored bubble water using mists and set the bubble station outside the house as it can get messy. My little helper was more than happy to blow a gazillion bubbles my way. Now if you don't want colour bubbles flying everywhere, then using a straw blow up bubbles in the container and take your paper on the bubbles, so the bubbles pop on the paper.We tried both techniques and ended up with this background. This is a canvas with gesso on it, but the technique worked well on plain cardstock and watercolour paper too.


Next, using washi tape, give the canvas a border. Gather embellishments or make some like I did : stamp some butterflies using Prima resist chalk and heat emboss them with Clear super fine embossing powder and Ranger heat gun. There is a huge range of butterfly stamps available in the Lulupu store. The title 'choose happy' is a silhouette cameo cut of a Heidi Swapp free printable. The rose and 'love this' piece are also cut using the Silhouette machine. Hand cut a tag and label with Heidi Swapp 'Dreamy' paper. Glitter a peg gold, using modpodge.
Time to add details: The first thing I did was gesso the title, so that it would dry by the time I got the layers ready. Next, using the 'love this' diecut as a stencil, sponge some ink through it on the bottom two corners. Hand write journalling  using the Zig Emboss Scroll and brush Twin tip marker and emboss it with gold super fine embossing powder. This pen writes clear, so you can easily emboss with any color embossing powder. 

I want to change the photo in this layout every few months, so I started with a photo mat and used gold photo corners to easily slide and change photos. Ive used small pieces of cardboard to raise each paper layer. This also gives room to tuck in embellishments easily while keeping the layers flat.Now all thats left is to stick down the doily, papers and embellishments. All in all, this layout took about two hours, with about 40mins on selecting embellishments and what to cut using the silhouette.


I hope today, you've picked up a technique or tip that you can use or even just a smile at the thought of popping colored bubbles on a paper. Hope to see your beautiful creation linked here for this month's challenge : Wings plus colors from this mood board.   
 
Supplies from the Lulupu Store:


Monday 11 May 2015

Altered Clock

Hello Friends!
Tanvi here with another project for Lulupu Challenge#49. You will find all the details for this challenge in Manu's post Lulupu Challenge #49 : Feminine - Use wings & Colour Palette.

I have altered a Tim Holtz Assemblage Clock inspired by the colors from the pic & for the twist WINGS, I have a bird, butterflies & an angel!

To begin I removed the glass & back panel of the clock & generously primed the surface by sponging gesso (2-3 layers). This lends a grainy texture. After this I colored the clock with distress inks - mowed lawn & salty ocean. The MDF cut outs were coated with mowed lawn distress paint & glued as desired with glossy accents.


I used liquid pearls to add defintion to the frame of the clock as well as the MDF frame.


The little angel (wings) here is from G45 - Sweet Sentiments. The bird perched on the flourish is coated with black soot distress crackle paint.


Glued to the inside of the back panel is a colorful printout of a clock face. Hanging here is also a miniature bird house! I have glued a resin door (colored with vintage photo distress ink) too. A flower under the arch of the door keeps it open , welcoming one & all!


Hanging on one side of the clock bell is a cute wish bottle with a secret message & cute feminine charms.


Here are some close ups of the clock! 


Hope you enjoyed todays' project & if you did do leave some love!
Thanks for dropping by!
Happy Crafting!


 Supplies available at LULUPU.COM